Create a webinar
-
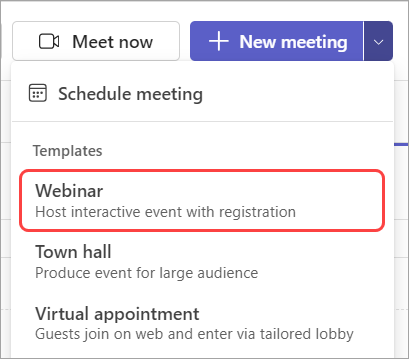
In the Teams calendar, select the arrow next to New meeting and select Webinar.
-
Enter the webinar details.

-
On the New webinar page, enter the title and date of the webinar, its start and end times, and a description. You can also add presenters and co-organizers to the event.
Tip: Consider setting a later start time for attendees on the registration form to give yourself and presenters time to prepare together before the event begins.
-
By default, the webinar will be Public, or open to anyone in and outside of your organization to register. You can change it from Public to Your organization, which will make the event page and registration available only to people within your organization
-
In the meeting notes section, you can add agenda items and notes, as well as assign pre-webinar tasks to presenters. This info is only shared with presenters.
Note: Attendees won't see the details entered on this form.
-
Select Save to move onto registration.
Note: When you save the event, invites will be sent to attendees automatically.
Add webinar co-organizers
Webinar co-organizers can help manage events by editing registration forms, customizing the event theme, and much more. Co-organizers can modify the event in many of the same ways an organizer can, except co-organizers can't change the webinar's Details section (date, time, etc.). Up to ten co-organizers and only those within your organization can be added.
To add a co-organizer to the webinar:
-
Follow the steps above in "Create a webinar" to make the event.
-
If you've already created a webinar, open it from your Teams calendar and select Manage event.
-
In the Details section, enter co-organizer names in the Co-organizers space.
-
Select Save.
Add webinar presenters
To allow others to present content during the webinar, list them on the invite. Presenters don’t need to register. They'll join the webinar in the same way that they join a regular meeting.
To add presenters while creating a webinar:
-
Follow the steps above to create a webinar.
-
If you've already created a webinar, open it from your Teams calendar and select Manage event.
-
In the Details section, enter presenter names in the Presenters space.

-
Select Save.
Notes:
-
External presenters who are federated or have guest accounts in your organization (tenant), will join as presenters only if they're signed into that account at the time of joining the webinar session.
-
External presenters who are not federate or have a guest account in your organization must have a Microsoft account to join a private webinar. If they join a public webinar, they can only join as an attendee. If the webinar is private, they will be denied entry.
-
If external presenters try to join without signing into the federated or guest account, when the meeting is set to:
-
Public, they will join as an attendee. You can then make them presenters once they join.
-
Private, they will be denied entry.
-
Private webinars don't support external presenters who are not federated and do not have a guest account in your organization.
Change webinar details
Once you've created and saved a webinar, it'll appear in your Teams calendar where you can manage its details.
To change webinar details after creating the event:
-
Go to your Teams calendar and select the webinar you want to edit.
-
Select  Manage event.
-
Change and add event details, presenters or co-organizers.
-
Select Save.
Notes:
-
Users who are registered, pending registration, or waitlisted for the webinar will automatically receive an email detailing changes to the event date or time.
-
If your event is already published, the event page will automatically update to reflect saved changes.